#XML Tutorial
Explore tagged Tumblr posts
Visit Tumblr Blog
Explore Tumblr blogs with no restrictions, modern design and the best experience.
Last Seen Tumblr Blogs


Fun Fact
In 2020, Tumblr had 29.4 million users in the US.
Text
From Markup to Mastery: Crafting XML Documents with Precision

In today's interconnected digital landscape, the seamless exchange and integration of data are paramount. Enter XML, the Extensible Markup Language, a powerful tool that facilitates structured data representation for diverse applications. Whether you're an aspiring programmer, web developer, or data enthusiast, our XML Tutorial provides a comprehensive guide to unlock the potential of this versatile language.
Understanding XML Fundamentals:
The XML Tutorial begins by demystifying the core concepts of XML, from its basic syntax to the role of elements and attributes. Gain insights into creating well-formed XML documents and harness the flexibility of tags for efficient data categorization.
Structuring Data with XML:
Dive deeper into the tutorial to learn about data structuring techniques using XML. Discover how XML's hierarchical structure simplifies the organization of information, making it a preferred choice for data interchange between different systems.
Real-World Applications:
With real-world examples, the tutorial demonstrates XML's relevance across industries. Explore how XML simplifies data sharing between applications, enhances web services, and facilitates seamless communication between disparate platforms.
Enhancing Interoperability:
As you progress, you'll uncover XML's role in enhancing interoperability among systems, languages, and databases. Learn how to validate XML documents using Document Type Definitions (DTD) and XML Schema, ensuring data accuracy and consistency.
In a data-driven world, mastering XML is a valuable asset. Our XML Tutorial equips you with the knowledge to create, validate, and exchange structured data efficiently. Whether you're crafting websites, developing applications, or simply curious about data representation, this tutorial offers a solid foundation. Explore the XML Tutorial at Tutorial and Example and embark on a journey of data structuring and integration excellence.
0 notes
Text

Unlock the potential of XML through our tutorial. Grasp the intricacies of markup, elements, and attributes. Learn to structure data logically, facilitating efficient sharing and integration across applications. Explore real-world examples, and elevate your understanding of XML's role in modern data-driven environments. Ideal for beginners and those seeking comprehensive insights.
0 notes
Text
How to Export and Import WordPress Posts and Pages: A Beginner's Guide
Managing a WordPress website comes with its challenges, but exporting and importing posts and pages shouldn’t be one of them. Whether you’re migrating to a new host, creating backups, or sharing content between websites, WordPress makes this process surprisingly simple. In this beginner-friendly guide, we’ll walk you through how to export and import your WordPress posts and pages, step by…
#backup WordPress content#export WordPress posts#how to export WordPress posts#how to import WordPress pages#import posts to WordPress#import WordPress pages#manage WordPress content#migrate WordPress content#transfer WordPress content#WordPress#WordPress admin tools#WordPress beginners guide#WordPress export and import tutorial#WordPress migration#WordPress tools#XML file WordPress
0 notes
Text
#tutorial#shorts#react#react developer#state vs props#props#State#Stateless components#Stateful Components#class components#functional component#hooks#life cycle methods#Components#JSX (JavaScript XML)#Props#Component Lifecycle#Functional Components and Hooks#React Router#State Management#Conditional Rendering#Lists and Keys#Forms and Controlled Components#Component Composition#Styling#Error Handling#Testing#Performance Optimization#React DevTools
0 notes
Text
How to Create or Edit CSV and XML Files to Import into WordPress
CSV (Comma Separated Values) and XML (Extensible Markup Language) are two commonly used file formats for data storage and exchange. CSV files store data in a tabular format where values are separated by commas. XML files, on the other hand, use a hierarchical structure to organize data with tags and elements. In this article, we will explore how to create and also edit CSV and XML files for importing into WordPress.
CSV and XML File Characters
CSV files primarily use characters like commas, double quotes, and line breaks to separate and format data. The comma acts as a delimiter between each value, while double quotes enclose values containing special characters or spaces. Line breaks indicate the end of a record or row. XML files use tags enclosed in angle brackets (<>) to define elements and their content. These tags provide structure and hierarchy to the data.
How do CSV files help in Your Business?
More or less all commercial platforms are using CSV files to import and export their ecommerce data to and from the database. CSV files are generally faster and consume less memory space when compared to the Spreadsheet. CSV files are handled by various businesses to save posts, products, and other requisite data.
Benefits of CSV Import
It is effortless to Install and child’s play to resolve any changes. Faster to handle the data. It runs in no time to import and export the file.
How to Open a CSV File
To open a CSV file, you can use various text editors or spreadsheet applications. Here are a few popular options:
Using Notepad
Launch Notepad, a basic text editor that comes pre-installed on most Windows computers.
Go to the File menu and select Open. Navigate to the location of your CSV file, select it, and click Open. The CSV file will open in Notepad, displaying the data in plain text format.
Using Notepad++
Download and install Notepad++, a free source code editor and launch Notepad++.
Go to the File menu and choose Open. Find your CSV file, choose it, and press the Open button. Notepad++ will display the CSV file with syntax highlighting and better readability.
Using MS Excel
Open Microsoft Excel, a widely-used spreadsheet application. Click on the File tab >> Open.
Browse to the location of your CSV file, select it, and click Open. Excel will automatically detect the CSV format and present the data in a spreadsheet view.
Using Google Sheets
Open a web browser and navigate to Google Sheets. Sign in with your account or create one.
Click on the File menu and select Import. Choose Upload and select your CSV file from your computer. Google Sheets will import the CSV file and display it in a spreadsheet format.
Using LibreOffice
Launch LibreOffice, a powerful open-source office suite. Click on the Calc option to open the spreadsheet application.
Go to the File >> Open. Navigate to the location of your CSV file, select it, and click Open. LibreOffice Calc will automatically detect the CSV format and present the data in a spreadsheet view.
Using OpenOffice Calc
Start OpenOffice, another popular open-source office suite. Select Calc from the available applications to open the spreadsheet component.
Click on the File menu >> choose Open. Find your file location and open it.
How to Prepare a CSV file using Notepad++?
Open Notepad++ for Windows and text editor for Mac. On the new file, start to create field names separated by comma values. Add field headers in the first row. Beneath the headers, add the field values.
Save the file with .csv extension by visiting File > Save as > Name.csv
Likewise, you can create your preferred CSV file with various text editors and save it in the .csv extension.
Using Notepad
Launch Notepad, a basic text editor available on most Windows computers.
Start by opening a new blank document. Type or copy and paste your data, ensuring each value is separated by a comma. To indicate a new row, press the Enter key after entering each set of values. Save the file with a .csv extension, ensuring the “Save as type” field is set to “All Files” in the save dialog box.
Using MS Excel
Open Microsoft Excel and enter your data into the cells, with each value in its respective column.
Save the file as a CSV by visiting the File menu, selecting Save As, and choosing CSV (Comma delimited) as the file format.
Using Google Sheets
Open a web browser and navigate to Google Sheets. Create a new sheet by clicking on the “+” icon or open an existing one. Enter your data into the cells, following the desired table structure.
To save the sheet as a CSV file, go to the “File” menu, select “Download,” and choose Comma-separated values (.csv, current sheet).
Using LibreOffice
Launch LibreOffice, a free and open-source office suite. Open Calc, the spreadsheet program in LibreOffice. Enter your data into the cells, organizing it into columns and rows.
Move to File >> Save As. Select CSV from “Save as type” and click Save.
Using OpenOffice Calc
Open OpenOffice Calc and enter your data into the cells, ensuring proper column and row alignment.
Select the File menu and choose Save As. Specify the CSV format in the Save as type field and click Save.
Downloading and Opening a Sample CSV File for Importing
To practice importing CSV files into WordPress, you can download sample CSV files from our website. Get access to the collection of sample CSV files. Download the desired file and save it to your computer. Then, follow the previous steps to open the downloaded CSV file in your preferred editor. You can also get sample XMLs by visiting the above link.
How to Edit a CSV File
Editing a .csv (Comma-Separated Values) file is a straightforward process that can be done using a variety of software applications. Here’s a step-by-step guide on how to edit a .csv file.
Open the .csv File
Launch a spreadsheet software application like Microsoft Excel, Google Sheets, or a text editor capable of handling .csv files. Navigate to the file location and open the .csv file in the chosen application.
Review the Data
Take a moment to review the data within the .csv file. Familiarize yourself with the columns, rows, and the overall structure of the data. This step will help you understand the information you’re working with and plan your edits accordingly.
Make Changes to the Data
To edit a cell
Locate the cell you want to modify and click on it. Then, simply type the desired changes directly into the cell.
To insert a new row or column
Right-click on an existing row or column, and choose the “Insert” option. This will add a new row or column where you can enter your data.
To delete a row or column
Select the row or column you want to remove, right-click, and choose the “Delete” option. Confirm the deletion if prompted.
Format the Data
If needed, you can apply formatting options to enhance the appearance of the data. This may include changing font styles, adjusting column widths, setting date or number formats, or applying conditional formatting to highlight specific data points.
Save the Edited File
Once you have made the necessary changes, save the edited .csv file. Use the “Save” or “Save As” option in your software application to overwrite the existing file or create a new file with the modifications. Choose the .csv file format when saving to ensure the data remains in the proper format.
Validate the Edited Data
After saving the edited .csv file, it’s a good practice to validate the changes you made. Check the data to ensure that the edits are accurately reflected and that the file still maintains its integrity.
Test Import/Export Operations
If you plan to import or export the .csv file into another system or application, perform a test operation to verify that the edited file functions as intended. This step helps ensure that the data is correctly processed in the target system.
Remember to back up your original .csv file before making any edits to avoid permanent data loss. Additionally, consider documenting your changes or keeping a record of the editing process for future reference.
By following these steps, you can confidently edit a .csv file, modify the data within it, and save the changes for further use or analysis.
How to fix all my CSV data appears in the first column
If you are experiencing the issue of all your CSV data appearing in the first column when opening the file in spreadsheet software, here are some steps to help you fix this problem:
Open the CSV File
Open any preferred spreadsheet software. Navigate to the location where your CSV file is stored and open it within the application.
Check the File Format
Make sure the CSV format is right and also the extension is saved as ‘.csv’ and not in another file extension.
Use the Text Import Wizard
Most spreadsheet software offers a Text Import Wizard or a similar feature to handle CSV files with specific settings. Look for an option like “Import” or “Text to Columns” within the software.
Specify the Delimiter
In the Text Import Wizard, you will be prompted to specify the delimiter used in the CSV file. Common delimiters include commas (“,”), semicolons (“;”), tabs (“\t”), or spaces. Select the appropriate delimiter that separates the fields in your CSV file.
Choose the Correct Data Format
If your CSV file contains numerical data or dates, you may need to specify the appropriate format for each column. For example, you can select “General” for text, “Number” for numerical values, or “Date” for date fields.
Adjust Column Widths
After importing the CSV file, check if the column widths need adjustment. Sometimes, when all the data appears in the first column, it might be due to narrow column widths that are not automatically adjusted by the software. Double-click on the column separators or use the “AutoFit Column Width” option to ensure the data is properly displayed.
Review the Data
Take a moment to review the CSV file’s content and verify that the data is now correctly distributed across multiple columns. Ensure that each field is in its appropriate column and that the rows and columns align as expected.
Save the Corrected CSV File
If the data is now displayed correctly in the spreadsheet software, save the file with the corrected formatting. Use the “Save” or “Save As” option to overwrite the original file or create a new file with the corrected data.
By following these steps, you should be able to resolve the issue of CSV data appearing in the first column. The Text Import Wizard helps you specify the delimiter and format settings, ensuring that the data is properly separated and distributed across the respective columns within the spreadsheet software.
How do XML files help in Business?
XML lets you extend data when it is needed. What’s more beneficial about XML files for your business, it supports Multilingual.
Benefits of XML File Import
It is faster than any other file format and can store a lot of customized data. XML data can be sent via the Internet. So that it can get access from anywhere.
How to Open an XML File
To open an XML file, you can use various text editors that support XML syntax highlighting and editing. Here’s how to open an XML file:
Using Notepad++
Launch Notepad++ if you have it installed on your computer. Go to the “File” menu and select “Open.”
Navigate to the location of your XML file, select it, and click “Open.” Notepad++ will display the XML file, providing syntax highlighting and improved readability.
Using Code Browser
Launch Code Browser, a versatile code editor with XML support. Navigate to the “File” menu and select “Open” or use the shortcut Ctrl+O. Find and visit the XML file and open it.
Code Browser will display the XML file, providing syntax highlighting and an organized view of the XML structure.
Using Atom
Open Atom and click on the “File” menu. Select “Open” or press Ctrl+O.
Browse your XML file and open it. Atom will load the XML file, providing syntax highlighting and a user-friendly environment for viewing and editing XML content.
Using Edit Plus
Launch Edit Plus, a powerful text editor with XML support and a range of features for efficient editing. Visit the File menu and open the desired file.
Edit Plus will open the XML file, displaying the content with syntax highlighting and customizable editing options.
Using other editors
If you prefer to use a different text editor, ensure that it supports XML file editing. Examples of popular XML editors include Sublime Text, Visual Studio Code, and Atom.
Open your preferred editor and use the file navigation options to locate and open the XML file.
How to Prepare an XML File
To prepare an XML file for importing into WordPress, you can follow these steps:
Using Notepad++
Launch Notepad++ if it’s installed on your computer. Go to the “File” menu and select “New” to create a new blank document. In the new document, start defining the structure of your XML file by adding opening and closing tags.
Add elements, attributes, and content within the tags to represent your data. Continue adding tags and nesting them as needed to organize your XML structure. Save the file with a .xml extension, giving it an appropriate name.
Using Code Browser
Open Code Browser, an XML-specific editor that provides features for easier XML file creation. Click on the “File” menu and choose “New” to create a new XML document. Use the editor’s interface to define the structure of your XML file. Add elements, attributes, and content as necessary. Save the file with a .xml extension, providing a relevant name.
Using Atom
Create a new file by going to the “File” menu and selecting “New File.” Begin constructing the XML structure by adding opening and closing tags.
Fill in the tags with elements, attributes, and content based on your XML requirements. Save the file with a .xml extension, choosing an appropriate name.
Using Edit Plus
Start a new document by selecting “New” from the “File” menu. Begin building your XML file structure by adding the opening and closing tags. Populate the tags with elements, attributes, and content specific to your XML data. Save the file with a .xml extension, naming it suitably.
Using other editors
If you prefer to use a different text editor, ensure that it supports XML file creation and editing. Open your chosen editor and create a new document. Follow the XML syntax rules to define the structure and elements of your XML file. Add attributes and content as needed, keeping in mind the hierarchical structure of XML. Save the file with a .xml extension and an appropriate name.
How to edit it?
Open the XML file in Notepad++ or any other XML editor. Review the file’s structure and hierarchy, making sure it adheres to the XML specifications. Ensure that each element is properly enclosed within opening and closing tags (<element>…</element>). Validate the XML file using an XML validation tool or online XML validator to ensure it is well-formed.
How to re-update Data into WordPress?
Export your desired content in XML format. Then edit the data on your exported file. Again import the same file into WordPress.
Bulk Import - What is it?
Bulk import is importing a large amount of data into WordPress. For example, importing more than 1000 records into WordPress.
How to Prepare Bulk Import Files in CSV?
For illustration, the product list has various products with its specification.
To store and update those products listed on the website, you can create 1000’s products in an Excel sheet and save that file in CSV format, and import that CSV file using WP Ultimate CSV Importer.
Conclusion
Creating and editing CSV and XML files for importing into WordPress requires careful attention to formatting, structure, and compatibility. Try to follow the above-explained steps. You can successfully create and edit the CSV and XML files. Remember to validate the file structure, handle special characters appropriately, and use compatible software to open and edit the files. With these skills, you’ll be able to seamlessly manage data imports in WordPress and enhance the functionality of your website. If you want a bulk import and export plugin for WordPress, try the WP Ultimate CSV Importer plugin. The popular Import Export WordPress plugin with many satisfying features.
#wordpress#wordpress plugins#wordpress tutorial#cms#website development#plugins#blog post#csv#xml#import#csvimporter
0 notes
Text

WIP #1 - Stories Be Told
A mod that has arisen from playing TS2 and loving Stardew Valley! (and always wanting to get to know the townies a bit better :))
I know I haven't really replied too much on the post about the mod idea, but I had to figure out personally what to pick and how to even attempt this from a technical perspective.
I went through 5 adaptations, to eventually get to this result! :) So while most of it is definite, I'm still fine-tuning a lot (and writing the stories).
How does it work?
The mod comes with two ways to get to know your fellow townie! With townie, you have to understand that EA townies will have them. Newly generated townies will NOT have any stories.
🕵️♀️Secrets (aka, facts!)

Depending on your sim's Lifetime points (that red/green bar), and relationship status (friends, enemies, etc), you'll get to know more about them! Of course, if you're in the red, you might get some nasty comments!

The idea is that the better you get to know them, the more they open up. Just like real people! They all have their unique dialogue as well!
❤️ Heart Events ❤️
Inspired heavily by Stardew Valley's approach, as using the TS2's scripted events wasn't working technically speaking,
A heart event will trigger by itself with a Text message, just like getting an invitation for a party.
Let's have a look at one with Morgana's Heart events!

Morgana has sent a text message asking Christopher to come along to have dinner at her house. We could ignore it without any consequences... or go ahead and go anyway!

Your sim will automatically make their way to the place they are invited to go to! And Christopher just made it as well :)

(Not getting too much into spoilers here hehe) but eventually Thornton and Morgana end up in a fight.

What's cool is that certain heart events will want your input! Such as this one:

I'm still working on fixing the dialogue btw :p
Some of these will have pretty unpredictable outcomes, so be aware of that if you want your town to stay the same without any progression into a family's dilemma!

... and what's even better is that this all happened automatically!
Just like a scripted event, they ended up arguing where it made sense in the dialogue, moved to the kitchen to excuse themselves, and eventually asked the player to leave (of which the player did automatically!)
🛠 Info for World builders and Developers
What's even better is that you can make your stories yourself! While heart events will require you C#, the secrets will only require you the existing sim's Sim Id and some XML knowledge! :)
I'll make tutorials of course on how to make each, but I figured it would be good to add that this is all super flexible on making your own stories.
That's it! The mod is technically done from a technical perspective, but I still have loads of stories to write (I only finished Morgana's so far 😬), So any feedback at this point would be really appreciated so I can implement it before release! :)
I'll release it first with Stories for Sunset Valley first, then move on to twin brook, Bridgeport, etc.
#the sims 3#sims 3#the sims#ts3#sims#ts3 simblr#sims 3 story#sims 3 gameplay#sims 3 simblr#sims 3 screenshots#wip#sims 3 wip
666 notes
·
View notes
Text

I'm thrilled to announce the release of my latest Sims mod: "Elders Expanded"! 🌟
This mod is a labor of love aimed at enhancing the aging experience in The Sims, with a focus on expanding the lives of elder Sims. 🧓👵✨
In this mod, you'll discover a plethora of new features and interactions designed to immerse your elder Sims in the joys and challenges of growing older. From ailing health conditions like deteriorating eyesight and hearing to the need for dentures, to the services which'll make your elders twilight years easier, this mod offers a comprehensive and enriching gameplay experience for your elder Sims. 🏡🎉
Check out the guide document here for a detailed overview of all the features included in the mod and how to incorporate them into your gameplay. 📝👀
Video tutorial coming later today! Trailer also coming later today!
Thank you for your support and happy simming! 🌟😊
This mod REQUIRES these to work correctly:
XML Injector by Scumbumbo CoreLibrary by Lot51
Meal Truck Icon by Flat Icons Takeaway Bag Icon by AranagraphicsRocking Chair Schedule Icon by juicy_fish
DOWNLOAD
1K notes
·
View notes
Text


Posing Interaction for Babies (Newborns)
This mod adds an interaction to the bassinet to play poses with babies.
Based on my testing the interaction works wherever the sim is, even off lot. The baby spawns to your sim and afterwards back to the bassinet (little demo below).
As a placeholder I included a set of Gallery poses with babies. However, you can override them with your own. For that purpose, I’m including the pose files separately as well as the blend file I used that you can then use as a base (the blend file is saved in Blender 3.6). (You don't need to put the blend file into your mods folder.) Here is an alternative set of poses I made that you can use with the interaction.
XML Injector Required The XML injector is a tool/library that can be used to add interactions without the need to write your own script (another one that you might know is lot51’s core library). A script in my case would have been needed to add the posing interaction without overriding the existing game file with the baby tuning. The XML injector does that for me.
Download: SFS (*) | Mediafire
(*) Reuploaded the file to SFS on Feb 8th 2025, the old link was broken (I probably deleted the file by accident at some point).
This was just an experiment tbh but I was surprised that it works so well and so I ended up wrapping it up. But anyhow, in game interactions are pretty new to me, so let me know if there's any issue.
If you need any help making your own poses, you can also drop by in our Discord server for pose makers.
Some background information:
The baby is an object in-game that is connected to the adult sim via the stigmata bone for poses/animations – similar to poses with accessories, if you’re familiar with that. The difference is that you also need to pose the baby itself. I have some additional notes in this tutorial for Gallery poses with babies that I made a while ago.
Note that you can’t export baby poses or animations via S4S the standard way since you can’t select the baby rig in the S4S export options. I did this with a workaround by exporting the clips from the Game File Cruiser, then importing them to Blender using an add-on (it’s actually a deactivated part of the Blender add-on that S4S uses and it’s only functional in Blender 2.7).
However, you can import the blend files with baby poses to the package file like you normally would since the rig selection is not relevant for the import.
Below a little demo, sorry for the bad quality :D
@ts4-poses @luthsthings
971 notes
·
View notes
Text


Anime TV Channels Mod
...so. I love the anime mod for TS4, and was bummed out to find out nothing exists like that for TS3 (at least I couldn't find one) so with the mention this is my first mod (so excuse the possible dubious quality) I made my own and thought to share. :3
It comes with 19 new TV channels for your TS3 weeb sims. They are in dub.
@s3animefinds
Anime list (I tried to make it diverse but keep in mind I made this based on anime I either like or plan to watch): Jujutsu Kaisen, My Hero Academia, Seraph of the End, The Promised Neverland, Tokyo Ghoul, Death Note, Tokyo Revengers, Haikyuu, Blue Period, Demon Slayer, Pokemon, Hunter x Hunter, NaruSasuNaruto (not me making NaruSasu edits unintentionally during pride month I realized after actually. It's a sign.), Attack on Titan, Bungo Stray Dogs, Diabolik Lovers, Vampire Knight, Erased, Free
Keep in mind that some of the clips contain spoilers/gore
They have assigned traits! So sims with those traits will prefer these channels. Info under the cut (along some credits). Some are based on the vibe of the anime, some are nods to a specific character, some are because I'm evil lmao. IYKYK. Don't take them too seriously.
I added just for packs I personally have, so while the Loves to swim trait is perfect for Free I don't have Island Paradise so I didn't add it (you're free to do so if you know how however! :) ). I also don't have Into the Future so sorry if you wanted to watch anime on the holo TV!
please don't reupload all that stuff <3
this will conflict with any mod that edits the TV XML file
download
Jujutsu Kaisen: Adventurous Brave SupernaturalFan Charismatic My Hero Academia: Brave Good Friendly Excitable ComputerWhiz (this is a nod to Tomura cuz is the closest to a gamer trait) Seraph of the End: SupernaturalFan Diva (this is a nod to Ferid my diva sassy vampire king) NaturalCook ( ;) ) Vampire* The Promised Neverland: Brave NaturalCook (I'm evil.) FamilyOriented (i'm evil. x2) Tokyo Ghoul: Brooding NaturalCook (I'm evil. x3) SupernaturalFan Death Note: Genius BookWorm Perceptive Brooding Tokyo Revengers: Daredevil Rebellious VehicleEnthusiast Haikyuu: Athletic Ambitious Blue Period: Artistic Ambitious AvantGarde Demon Slayer: SupernaturalFan NightOwl NaturalCook (I'm evil x4) Adventurous LovesTheOutdoors Pokemon: Adventurous AnimalLover Excitable CatLover DogLover Equestrian Hunter x Hunter: Adventurous Excitable Angler Naruto: Charismatic Ambitious Loner (this is a nod to Sasuke my nonchalant emo king and my first anime crush. I started strong.) Attack on Titan: Daredevil Brave NaturalCook (I'm evil. x5) Bungo Stray Dogs: SupernaturalFan Perceptive BookWorm Diabolik Lovers: SupernaturalFan HopelessRomantic NightOwl Flirty (both bc it fits the vibe and as a nod to Laito) Irresistible Vampire* Vampire Knight: HopelessRomantic NightOwl SupernaturalFan Charismatic Vampire* Erased: Perceptive Genius Dramatic Good Free: Athletic Friendly
*this is a hidden trait! <3
credits:
this tutorial
things I used for the NaruSasu edits: 1 2 3 4
all the wonderful people I used already made clips by <3
the sim in the previews is an edited premade downloadable sim by @florydaax (she's a weeb and a baddie-)
71 notes
·
View notes
Text
WIP Update (Pottery Mod etc.)
Heyo, figured I'd give an update on my WIPs, especially as I mentioned previously about making a post about the pottery mod and proceeded to not do that...
Long story short, I had to take a break from working on the pottery mod for a little while, then I didn't pick it back up when I could, became afraid to look at it, started other WIPs including a cow mod and a script modding tutorial project, and now am working on a project tangential to the pottery mod - a material state editor tool! I'm pretty excited about it because I'm diving into using S3PI and I'm honestly just surprised it's working out so far. This tool should make it less tedious to add all the glaze types to the ceramics for the pottery mod, and maybe someone else will find it useful too! At least my future self will if I make another mod that involves objects with material states... otherwise it's me spending 50 hours working on a tool to automate something that might take 5 hours! Yay technology...! I'm also hoping this post will help get me back into working on the pottery mod itself... I already had to fix a problem I so kindly left for myself in the code before I stopped working on it, in order to finish getting the screenshots, so that's good?
Anyway here is an overview of the pottery mod so far, and my plans for it:
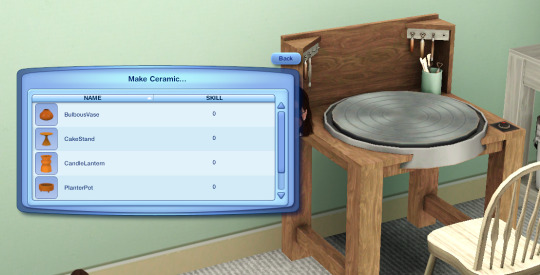
Interaction
I have a Make Ceramic interaction, with the converted sims 4 pottery wheel, where you can pick the ceramic to make and the sim will sit at the wheel, and make it! I still have more animations to convert but I might not do all of them for simplicity's sake.
Skill
Currently just have a basic pottery skill, which will determine which items your sim can make, but I could add a couple of skill stats and maybe challenges.
Objects
I've also made some progress on converting the sims 4 pottery objects, but it will also be easy to add other objects to the XML file if you want.
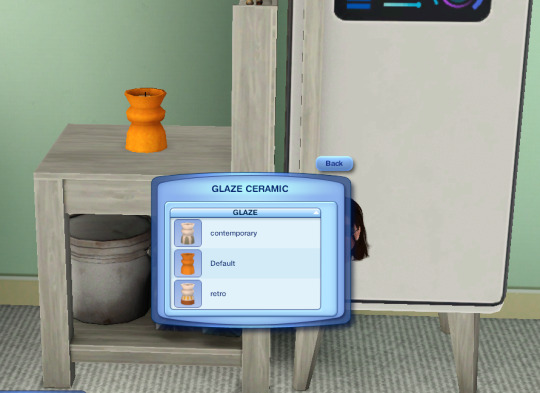
Glazing
I also have an XML set up for selectable glazes, so you can pick in game which sims 4 glaze you want for the sims 4 objects, as well as a default one which will be fully CAStable. It's therefore possible to add selectable glazes to other objects, but you'll need to be comfortable adding the textures as material states rather than regular presets. But CASt has you covered anyway :p
Kiln
The kiln object is where you finish the ceramics, either choosing a sims 4 glaze or a normal CAStable version. Sims 4 has the kiln process be almost instant, but I have it so the ceramic will take a few hours to finish and your sim can come and pick it up later - like the nectar machine from WA.
Still to do:
Finish converting the sims 4 ceramics
Set up the glazes for them
Add more pottery animations
Skill improvements
Add sounds to wheel and kiln
Mod in action:


115 notes
·
View notes
Note
Hiiiii!
So I've had the little looplet creature running around my screen for about a week now and I have made the very time consuming decision to make one of my own, do you by any chance have an explanation on how you made the looplet so animated? any advice on the extra coding?
thank you so much!
I edited ALL THE XML FILES NYEHAHAH!!! The easiest way to make a shimeji is to replace the artwork files only, but I wanted to do some unique things like make a faster, 3-frame run cycle, instead of the default slow 4 frames (2 repeated) run cycle. Doing that is as easy as changing this (in the actions.xml file):

To this:
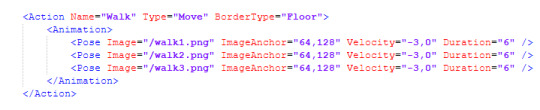
You can rename your image files and so long as the names match in the action.xml file then they will run perfectly, so use this to keep things more organised. You can also change the name of an action (e.g. i could rename walk to strut) so long as it's the same in both the actions.xml and behaviors.xml files. I'll give a short explanation of what each bit of code does below, so you can edit them to your heart's desire:
IN ACTIONS.XML:
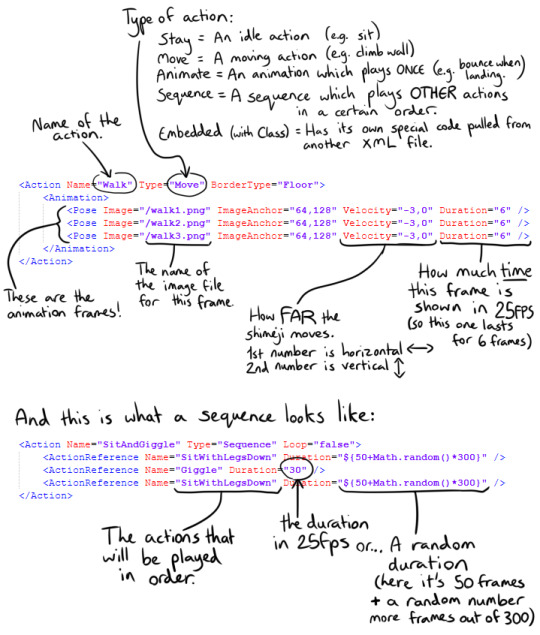
IN BEHAVIORS.XML:

I would recommend using Notepad++ for editing these files!
I would also recommend referring to this guide (by Cachomon) for improving a base shimeji into something a bit prettier, though there was a lot of it I didn't follow out of personal preference! [Improving a Shimeji Tutorial (pdf)]
Other than editing the base animations just using my own animation knowledge, I added some more things such as Affordances (aka interractions between shimejis) and Hotspots (which let you pet them). These are a bit more complicated, but you can find explanations for how they work by the official shimeji creator (KonfluxGames) in these videos here: [Affordances Video] [Hotspots Video]
I got stuck a couple times while adding these more complicated features, especially the 'dragging interaction' animation, but it would take a long time to explain what my difficulties were so I won't go into it unless someone specifically wants to know.
Good luck with making your shimeji! You got this!
146 notes
·
View notes
Text


Modern Map Tags by vesko_sims3
"Description : This is a default replacement mod that overrides the image of the map tags shown in town view of your world with modern, stylish flat design. I did this mod because I never liked the look of the original map tags so I did some work If you want sim tags to be shownq you have to have Tagger mod by Chain Reaction Conflicts : As this is a DDS replacer, it isn't a real "mod" exactly. It's not a global mod, core mod, or XML tuning mod, and will not conflict with anything unless you have something that replaces the exact same texture files. As such, it is compatible with all versions of the game, will not need updating for EPs/patches, and really is about as safe and simple as anything possibly can be. Installation : After download, place it in Mods/Packages or Mods/Overrides folder, usually located in C:/Users/Documents/Electronic Arts/The Sims 3. To be shown in game, you should delete the cache files, generated after every game:
CASPartCache.package
scriptCache.package
compositorCache.package
socialCache.package
simCompositorCache.package
Credits and thanks : Special thanks to Lyralei for her's default replacement tutorial Peter and Inge Jones for The Sims 3 Package Editor (aka s3pe)
...more pictures on MTS."
More Info + Download @ MTS.
155 notes
·
View notes
Text
Repost of my Mini WantTrees tutorial
Mini tutorial on custom WantTrees using the Break Up want as an example
Don’t ever open WantTrees without doing this though: Copy and paste your WantTrees (in Program Files not Documents!!) into a safe folder. Do not open it while it is in your Program Files.
Then, when it is safely somewhere else on your PC, you can open it, edit it, and then just copy and paste it into your program files. I always make a BACKUP of the Maxis want trees when I do this. I keep a folder of several different WantTree versions actually and I change them based on the hood (for example, Roaring Heights is edited to have no computer wants etc.)
Needless to say, you should only have one wanttrees at a time in your Program Files and only edit the boolean keys inside the individual WNTTs or … you could delete entire WantTrees but … I wouldn’t advise it.
In WantTrees in SimPe, it will look overwhelming. But gradually you will get used to it. The three instances for “Break up” wants are 0x6DB3A03E, 0xADE345CE and 0xCDCE5F06! You can sort by Instance in the WantTrees package. Let's look together! First, ensure you are looking at this file in the RESOURCE LIST

You will see a very long list of text files. They are basically just Notepad files and you can export them as text files for easier use, but I just edit them in SimPe.
Open those instances that I mentioned by clicking on them in the Resource List and then switching to PLUGIN VIEW and you will see what looks like this

What you want to be looking for is this line:

This tells you the name (and the ID number directly after the name) of the Want that the game is trying to assess based on the selected Sim.
If it says "alphaTrigger" then it is a Want TRIGGER, which means an event that happens in the game that triggers certain wants, so don't mess with those!
From this first section of code, it looks like the game is applying the upcoming wants to becoming a teenager - with a TRIGGER of the Sim becoming a Teen.

Once we scroll down, we get to the next referred want or want trigger. This one is what you need! It just says "alphaFallInLove" so this is referring to the want to fall in love, NOT a trigger. This can be verified by using PickNMix's object and want spreadsheet to check the 8 digit code AFTER it says "AlphaFallinLove" : the want ID for this particular want is cdaa9450
So, this section will tell you the Want that it's referring to, but you still have scrolling to do!

THIS is the important section. This section is determining WHICH TYPE OF SIM can roll this want!
From this, it looks like the Want is weighted heavily (do you see where it says WEIGHT? and it's set to 100?) to be rolled by Family Sims, but there are some other details that I am not sure of, so let's just look at the "Break Up" want.

Ok, we found the actual want. Now to scroll down and see what types of Sims are coded to roll this want.
I would also suggest looking at the order of the wants that are referred to. It can be confusing to figure out what MAXIS was doing, but often, if you scroll down to the VERY END of the XML editor, you will see comments from MAXIS explaining the specific WantTree. But not with all of them! It takes some context clues!

So, as you can see, in the "Age" section, Teens are the only ones who can roll the Break Up want. All you need to do is change where it says "False" to true for Adults and Elders!
Then you can add your own customizations! In the aspiration section, it is coded that only Family aspiration can roll the Want to break up, but what about changing False to True for Pleasure Sims? Try it out! Also, to reiterate, do you see where it says WEIGHT? And how it is set to ZERO for all the sections? I would play around with that. I assume certain wants are WEIGHTED to be rolled by certain ages, aspirations, or personalities.
Also, let's edit personality! Why not? Let's change False to True for Mean Sims to want to break up, and Serious Sims! notice I also changed the Weight

Now, this is untested, but the worst that will happen is wants will get rolled that don't make sense for your selected Sim.
You can play around endlessly with this. Just don't touch the TRIGGERS, only play with where the actual WANTS are being referred to. And investigate the ORDER of the sections ... most of the time the ORDER of the sections suggests a PROGRESSION of wants being rolled.
Any more questions? If so, feel free to DM me. I'm at my computer a lot :)
Happy Simming and modding!
#sims 2 simblr#sims 2 gameplay#sims 2#sims community#sims 2 guide#sims 2 wanttrees#sims 2 wants#sims 2 simpe#simpe#Sims 2 modding#the sims 2#ts2
30 notes
·
View notes
Text
#tutorial#shorts#react#react developer#state vs props#props#State#Stateless components#Stateful Components#class components#functional component#hooks#life cycle methods#Components#JSX (JavaScript XML)#Props#Component Lifecycle#Functional Components and Hooks#React Router#State Management#Conditional Rendering#Lists and Keys#Forms and Controlled Components#Component Composition#Styling#Error Handling#Testing#Performance Optimization#React DevTools
0 notes
Note
I feel the most comfortable asking you this but I am STRUGGLING with severe lag in my TS3 game. I just did a clean install, tried smooth patch, took it out bc it was conflicting with Nraas and didn’t make a difference, but it’s still nearly unplayable. I’ve tried every tutorial under the Sun. don’t remember having this issue years ago when I played. Do you have any tips or tutorials that you recommend? TY in advance!
heyy 💛💛
the only tutorial i really followed was the sims 3 performance and bug fix guide hosted on steam which i'm sure most sims 3 players know about. i'm not sure how helpful my answer will be but this is what i would suggest:
smooth patch
i believe nraas and smooth patch conflict in create-a-sim mode, you can't enable master controller's compact mode with smooth patch integrated with it. so what i did was:
first, install smooth patch according to the MTS page instructions. you should have "ld_SmoothPatch" and "ld_SmoothPatch_MasterController" in your Mods/Packages folder
using s3pe, open "ld_SmoothPatch.package"
in the s3pe screen, right-click on the xml thingy named LazyDuchess.SmoothPatch.Tuning
in the right-click menu, click on "Notepad" then make sure kMasterControllerIntegration value = "False"
save and close the notepad window. then, in s3pe, save the change you made and close s3pe.
nraas mc and smooth patch should no longer conflict. this is the only nraas mc and smooth patch conflict that i am aware of, unless there are others...? but that's how i got them to play together.
lag
the main issues that used to cause super long loading times for me and lagging during gameplay were the following:
thousands of unmerged cc packages in my mods folder
laptop had HDD instead of SSD
framerate was not capped
a lot of script mods installed which were probably conflicting with each other and using a lot of resources in the background
sooo the steps i took were:
organized and merged most of my cc packages into packages smaller than 1 GB - reduces lag and load times
changing my laptop's hard drive to a SSD decreased load times and reduced lag dramatically for me - also adding more ram to my laptop probably helped. but this is a pretty extreme option. i had to replace my hard drive with a SSD because it literally died.
when i used to play on my laptop with a HDD, capping the framerate to 30 or 60 FPS helped to reduce the lagging during gameplay. you can limit the game's framerate using smooth patch, using "3Booter", or thru your computer's graphics card.
script mods like nraas story progression and mingos birds and bees are script mods that are known to cause lag in the game because they are resource heavy. the only way to remove the lag is to uninstall them or, for nraas SP, i set the speed of the story progression to the slowest option.
so yeah i hope that is helpful <3
190 notes
·
View notes
Text
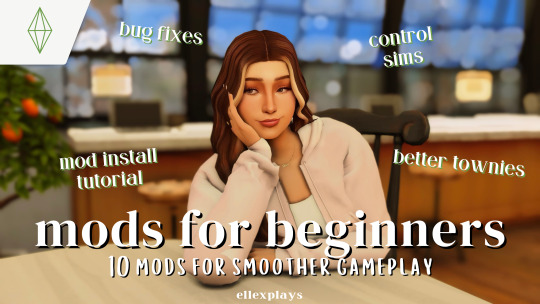
10 base game mods for smoother gameplay mod install tutorial & advice for beginners
mods list:
better exceptions - runs mod reports for outdated/conflicting mods
mc command center - change multiple settings of your sims game
ui cheats extension - use cheats by right clicking on the item
more columns in cas - changes cas to have 3-5 columns
stand still in cas - sims will no longer move/look around while in cas
control any sim - control sims that are not in your household
remove sims from conversations - remove sims by right clicking on their picture
steady sit & seat any sim + xml injector - sims stay seated for a longer period of time
smarter pie menu - search interactions by typing it in
phone call overhaul - adds conditions for sims to be able to call you
optional add ons:
npc fashion - adds preset outfits to random townies so they are dressed better
delayed invitations - allows a window of time before meeting with a sim when invited out
this video showcases my top 10 base game mods for new simmers. we will go further in depth to understand how to use each mod. there are so many mods out there and I know it can get overwhelming, so I hope this video helps ease yall into downloading/installing mods to your game!
now on youtube
113 notes
·
View notes